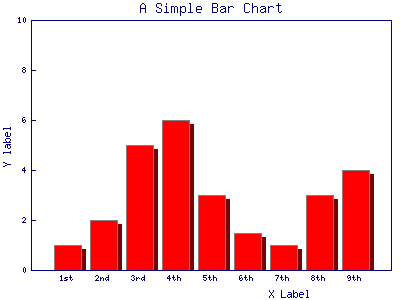
【要点】
(1)縦棒グラフ、横棒グラフ
  use GD::Graph::bars;    #縦棒グラフ
  use GD::Graph::hbars;   #横棒グラフ
  for my $my_graph (GD::Graph::bars->new, GD::Graph::hbars->new)
(2)データセットのカプセル化
  データセットの配列化にGD::Graph::Data;を使用
  しています。GD::Graph::Data;を 使用する場合と
  使用しない場合の違いは、「Perlでグラフを作成
  する」のTOPページ参照して下さい。次のように無名配列を
  []で囲みます。
  my $data = GD::Graph::Data->new([
    ["1st","2nd","3rd","4th","5th","6th","7th", "8th", "9th"],
    [    1,    2,    5,    6,    3,  1.5,    1,     3,     4],
 ]) or die GD::Graph::Data->error;
  データセットのカプセル化した場合、グラフの出力のデータセットの
  の参照方法に注意。
 $my_graph->plot($data) or die $my_graph->error;

(3)グラフに影をつける(現在、棒グラフ(bars/hbars)のみ)
  # shadows
  bar_spacing     => 8, #棒と棒との間を空間のピクセル数。
  shadow_depth    => 4, #影の深さ。正の値は右/下の影、
                        #負の値は左/上の影。
                        #デフォルトは0(影なし)。
  shadowclr       => 'dred', #影の色。GD::Graph::colour
                             #で定義されている色。
(4)色について
  棒、線、点(マーカー)、円グラフ等の色は、dclrsで設定しますが、
  この例では、デフォルト値(lred lgreen lblue lyellow lpurple cyan lorange)
  により、棒はlred(赤)がで描かれます。
■sample11.pl
chdir("C:\\Inetpub\\wwwroot\\uriage"); #カレントディレクトリ指定(IISの場合)
use lib 'C:/Inetpub/wwwroot/uriage'; #GD::Graphライブラリ格納フォルダ GD (固定)の場所
#
use strict;
use GD::Graph::bars;
use GD::Graph::hbars;
use GD::Graph::Data;
require 'save.pl';
my $data = GD::Graph::Data->new([
["1st","2nd","3rd","4th","5th","6th","7th", "8th", "9th"],
[ 1, 2, 5, 6, 3, 1.5, 1, 3, 4],
]) or die GD::Graph::Data->error;
my @names = qw/sample11 sample11-h/;
for my $my_graph (GD::Graph::bars->new, GD::Graph::hbars->new)
{
my $name = shift @names;
print STDERR "Processing $name\n";
$my_graph->set(
x_label => 'X Label',
y_label => 'Y label',
title => 'A Simple Bar Chart',
#y_max_value => 8,
#y_tick_number => 8,
#y_label_skip => 2,
#x_labels_vertical => 1,
# shadows
bar_spacing => 8,
shadow_depth => 4,
shadowclr => 'dred',
transparent => 0,
)
or warn $my_graph->error;
$my_graph->plot($data) or die $my_graph->error;
save_chart($my_graph, $name);
}
(参考)
●本ソースコードの1〜3行目(挿入)
1 chdir("C:\Inetpub\wwwroot\uriage"); #カレントディレクトリ指定(IISの場合)
2 use lib 'C:/Inetpub/wwwroot/uriage'; #GD::Graphライブラリ格納フォルダ GD (固定)の場所
3 #
Windows IIS 走行用に元ソースに挿入
●>save.pl(グラフ画像保存ルーチン)
 最終更新日:2005.1.17