【要点】
(1)縦棒グラフ、横棒グラフ
   GD::Graph::bars;    #縦棒グラフ
   GD::Graph::hbars;   #横棒グラフ
  for my $my_graph (GD::Graph::bars->new, GD::Graph::hbars->new)
(2)棒(バー)の描き方
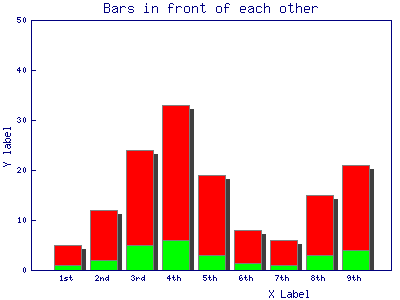
  overwrite       => 1, #  0:違うデータセットの棒は
                        #  隙間無く表示(デフォルト)
                        #  1:互いの前に重なる
                        #  2:上に積み重ね(この場合
                        # cumulateを使用する)
(3)グラフに影をつける(現在、棒グラフ(bars/hbars)のみ)
  bar_spacing     => 8, #棒と棒との間を空間のピクセル数。
  shadow_depth    => 4, #影の深さ。正の値は右/下の影、
                        #負の値は左/上の影。
                        #デフォルトは0(影なし)。
(4)色について
  棒、線、点(マーカー)、円グラフ等の色は、dclrsで設定しますが、
  この例では、デフォルト値(lred lgreen lblue lyellow lpurple cyan lorange)
  により、棒はlred(赤)とlgreen(緑)で描かれます。(データセットの定義順に)
■sample13.pl
chdir("C:\\Inetpub\\wwwroot\\uriage"); #カレントディレクトリ指定(IISの場合)
use lib 'C:/Inetpub/wwwroot/uriage'; #GD::Graphライブラリ格納フォルダ GD (固定)の場所
#
use strict;
use GD::Graph::bars;
use GD::Graph::hbars;
require 'save.pl';
my @data = (
["1st","2nd","3rd","4th","5th","6th","7th", "8th", "9th"],
[ 5, 12, 24, 33, 19, 8, 6, 15, 21],
[ 1, 2, 5, 6, 3, 1.5, 1, 3, 4]
);
my @names = qw/sample13 sample13-h/;
for my $my_graph (GD::Graph::bars->new, GD::Graph::hbars->new)
{
my $name = shift @names;
print STDERR "Processing $name\n";
$my_graph->set(
x_label => 'X Label',
y_label => 'Y label',
title => 'Bars in front of each other',
#y_tick_number => 8,
#y_label_skip => 2,
overwrite => 1,
bar_spacing => 8,
shadow_depth => 4,
transparent => 0,
);
$my_graph->plot(\@data);
save_chart($my_graph, $name);
}
(参考)
●本ソースコードの1〜3行目(挿入)
1 chdir("C:\Inetpub\wwwroot\uriage"); #カレントディレクトリ指定(IISの場合)
2 use lib 'C:/Inetpub/wwwroot/uriage'; #GD::Graphライブラリ格納フォルダ GD (固定)の場所
3 #
Windows IIS 走行用に元ソースに挿入
●>save.pl(グラフ画像保存ルーチン)
 最終更新日:2005.1.17