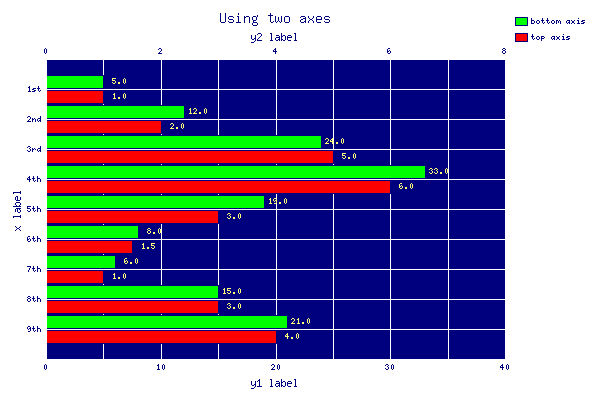
【要点】
(1)縦棒グラフ、横棒グラフ
   GD::Graph::bars;    #縦棒グラフ
   GD::Graph::hbars;   #横棒グラフ
  for my $my_graph (GD::Graph::bars->new(600,400),
             GD::Graph::hbars->new(600,400)) #()内数字はグラフキャンバスの大きさ
(2)データセットのカプセル化
   GD::Graph::Data; #GD::Graphのサブクラス。データセットのカプセル化

  my $data = GD::Graph::Data->new(
  [ #データセットを[]で囲む
    ["1st","2nd","3rd","4th","5th","6th","7th", "8th", "9th"],
    [    5,   12,   24,   33,   19,    8,    6,    15,    21],
    [    1,    2,    5,    6,    3,  1.5,    1,     3,     4],
  ]
  )

  ※データセットのカプセル化をした場合、
  グラフを出力(描く)場合の変数の使い方に(リファレンス)注意します。
    $my_graph->plot($data)

(3)2つのY軸を使用する
  two_axes  => 1,  #2つのY軸を使用する(デフォルトは0)
                   #2つのデータセットの最初のデータセットは左Y軸、
                   #次のデータセットは、右Y軸に使用される。
  y1_label  => 'y1 label', #y1左Y軸のラベル名
  y2_label  => 'y2 label', #y2右Y軸のラベル名
  y1_max_value => 40, #y1左Y軸の目盛りの最大値40
  y2_max_value => 8,  #y2右Y軸の目盛りの最大値8
                      #目盛の数は、y_tick_numberで指定します。
                      #y_tick_numberのデフォルトは5(間隔は4)。
(4)グラフをカラフルにする‐色を付ける
  bgclr => 'white',     #グラフの背景色(Background)
  fgclr => 'white',     #前景色(foreground)(軸とグリッド)
  boxclr => 'dblue',    #軸の箱の色
  accentclr => 'dblue', #アクセント(accent)(棒グラフ、面グラフ、円の外枠)
  valuesclr => '#ffff77', #影(棒グラフのみ)
  (その他の色について)
    棒、線、点(マーカー)、円グラフ等の色は、dclrsで設定しますが、
    この例では、デフォルト値(lred lgreen lblue lyellow lpurple cyan lorange)
    により、棒はlred(赤)とlgreen(緑)で描かれます。(データセットの定義順に)
(5)グラフキャンバスの余白を取る
  l_margin => 10, #キャンバスの上(Top)マージン。デフォルトは0(以下同様)。
  b_margin => 10, #下(Bottom)マージン
  r_margin => 10, #左(Left)マージン
  t_margin => 10, #右(Right)マージン
(6)グラフにロゴを貼り付ける(GD(2.16)+GD::Graph(1.43) では、正しく動作しない)
  logo => 'logo.' . GD::Graph->export_format, #ロゴのファイル名
                             #メソッドexport_formatは、使用可能な拡張子を
                             #取得出来ます。
  logo_position => 'BR',     #'LL', 'LR', 'UL', 'UR'のいずれか。デフォルト'LR'。
                             #Lower(下),Upper(上)とLeft(左),Right(右)。
                             #ここの'BR'は誤り?
(7)グラフの値をデータポイントの上に描く
  show_values => 1,         #1にすると各データポイントの値を表示する。
                            #デフォルト0。
  values_format => "%4.1f", #データポイントの値の表示フォーマット。
                            #Perl sprintfの引数。
■sample14.pl
chdir("C:\\Inetpub\\wwwroot\\uriage"); #カレントディレクトリ指定(IISの場合)
use lib 'C:/Inetpub/wwwroot/uriage'; #GD::Graphライブラリ格納フォルダ GD (固定)の場所
#
use strict;
use GD::Graph::bars;
use GD::Graph::hbars;
use GD::Graph::Data;
require 'save.pl';
$GD::Graph::Error::Debug = 5;
my $data = GD::Graph::Data->new(
[
["1st","2nd","3rd","4th","5th","6th","7th", "8th", "9th"],
[ 5, 12, 24, 33, 19, 8, 6, 15, 21],
[ 1, 2, 5, 6, 3, 1.5, 1, 3, 4],
]
) or die GD::Graph::Data->error;
my $values = $data->copy();
$values->set_y(1, 7, undef) or warn $data->error;
$values->set_y(2, 7, undef) or warn $data->error;
my @names = qw/sample14 sample14-h/;
for my $my_graph (GD::Graph::bars->new(600,400),
GD::Graph::hbars->new(600,400))
{
my $name = shift @names;
print STDERR "Processing $name\n";
$my_graph->set(
x_label => 'x label',
y1_label => 'y1 label',
y2_label => 'y2 label',
title => 'Using two axes',
y1_max_value => 40,
y2_max_value => 8,
y_tick_number => 8,
y_label_skip => 2,
long_ticks => 1,
two_axes => 1,
legend_placement => 'RT',
x_label_position => 1/2,
bgclr => 'white',
fgclr => 'white',
boxclr => 'dblue',
accentclr => 'dblue',
valuesclr => '#ffff77',
dclrs => [qw(lgreen lred)],
bar_spacing => 1,
logo => 'logo.' . GD::Graph->export_format,
logo_position => 'BR',
transparent => 0,
l_margin => 10,
b_margin => 10,
r_margin => 10,
t_margin => 10,
show_values => 1,
values_format => "%4.1f",
) or warn $my_graph->error;
if ($name =~ /-h$/)
{
$my_graph->set(x_labels_vertical => 0, values_vertical => 0);
$my_graph->set_legend('bottom axis', 'top axis');
}
else
{
$my_graph->set(x_labels_vertical => 1, values_vertical => 1);
$my_graph->set_legend('left axis', 'right axis');
}
my $font_spec = "../Dustismo_Sans";
$my_graph->set_y_label_font($font_spec, 12);
$my_graph->set_x_label_font($font_spec, 12);
$my_graph->set_y_axis_font($font_spec, 10);
$my_graph->set_x_axis_font($font_spec, 10);
$my_graph->set_title_font($font_spec, 18);
$my_graph->set_legend_font($font_spec, 8);
$my_graph->set_values_font($font_spec, 8);
$my_graph->plot($data) or die $my_graph->error;
save_chart($my_graph, $name);
}
(参考)
●本ソースコードの1〜3行目(挿入)
1 chdir("C:\Inetpub\wwwroot\uriage"); #カレントディレクトリ指定(IISの場合)
2 use lib 'C:/Inetpub/wwwroot/uriage'; #GD::Graphライブラリ格納フォルダ GD (固定)の場所
3 #
Windows IIS 走行用に元ソースに挿入
●>save.pl(グラフ画像保存ルーチン)
 最終更新日:2005.1.17